|
Horde Application Features:
Interface Options: You can adjust the size of your Horde mail window by going to
Options and editing the size of the menu on the left.
Cache Output on Public Computers: This option allows the ability of not allowing messages to be
saved as cached on the local computer. Our recommendation is you
don't cache pages when using public access or lab machines. Cache
using a home or dedicated office machine that you feel is secure.
 Reading Messages:
Once you have logged in to your mail account, the messages in your
"Inbox" will be displayed. To check for mail
received since you logged in, press the REFRESH icon: Reading Messages:
Once you have logged in to your mail account, the messages in your
"Inbox" will be displayed. To check for mail
received since you logged in, press the REFRESH icon:
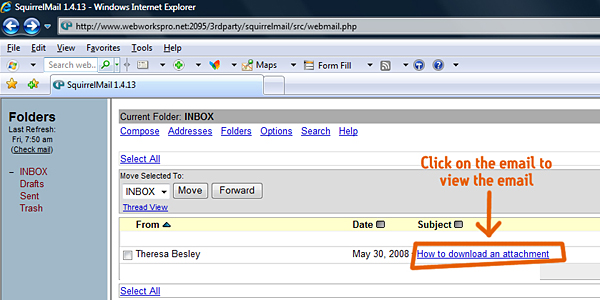
To display a particular message, click on the subject of the
message in the "Subject" column. The individual message will be
displayed. The page for the individual message contains command
buttons to allow you to reply to the message that you are reading,
to forward the message to another address, to delete the message,
or to examine the raw headers of the message.
You can use the message list to transfer messages to other
message folders. To move a message, locate the message that you
wish to move in a message list. Select the message by selecting
the checkbox, select the destination folder in box that has
“Messages to:” text inside of it and then click Move.
Reply: Reply to the sender of the original message
Reply All - Reply to the sender of the original message and all
recipients
Forward - Forward the message on to another e-mail address
Delete - Delete the message
Prev - Show the previous message in the list
Next Show the next message in the list
Headers Show the entire header of the message including all source
information
Multipart/Alternative Messages
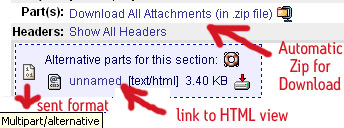 Some
messages you receive are sent in a "multipart/alternative" format
by the sender. These messages have several parts, all displaying
the SAME CONTENT but in DIFFERENT FORMATS. The mail agent will
display the last part in the list that can be successfully
displayed inline in the browser, if any. All other formats will
appear under the heading "Alternative parts for this section"
and can be viewed or downloaded separately. It is important to
note that these alternative parts contain the SAME CONTENTS as the
part that is shown - they are simply in a different media format
(e.g. text vs. HTML output). Some
messages you receive are sent in a "multipart/alternative" format
by the sender. These messages have several parts, all displaying
the SAME CONTENT but in DIFFERENT FORMATS. The mail agent will
display the last part in the list that can be successfully
displayed inline in the browser, if any. All other formats will
appear under the heading "Alternative parts for this section"
and can be viewed or downloaded separately. It is important to
note that these alternative parts contain the SAME CONTENTS as the
part that is shown - they are simply in a different media format
(e.g. text vs. HTML output).
Sorting Messages
You can sort messages using either the From, the Date, the Subject
or Size columns. To change the column by which the messages are
being sorted, single click on the column header (From, Date,
Subject, or Size).
The messages will then automatically sort based on the chosen
column. To switch from Ascending to Descending order or
vice-versa, click the previously selected column once again.
To reorder the Inbox so the most recent messages are first,
Click the word Date at the top of the columns. You may need to
click it twice.
Horde will only display a certain amount of messages per index
page. The default is 20 listings per index page. To change the
amount of listings per page, go to the options
menu and clicking on “Mailbox and Folder Display Options.” Then
simply change the value in the box next to “Messages per page in
the mailbox view.”
You can move to page 2 or any other page by selecting the
number or clicking Next Page at the bottom of the messages area.
Printing Messages
* Select the message you wish to print.
* Click once on the actual message to make it "active."
* Go to the file menu and select Print Frame using Netscape.
* For Internet Explorer, select Print. Then make sure the Print
frames section has selected and then click OK.
Command Buttons
The following buttons on the left side of your interface are used
for common tasks
Inbox
The "Inbox" button is used to reload the contents of the special
folder that receives all of your mail. It is similar to the "List"
command, except that it will change from whatever your current
folder is to the "Inbox" folder. If your current folder is the
"Inbox" folder, then the "List" and "Inbox" commands are
equivalent. Use the "Inbox" command when you want to check to see
if you have new mail.
List
The "List" command is equivalent to the "Inbox" command, but it
will not change folders. This is useful for returning to the list
of messages in a folder from viewing a single message when you are
using the single-pane interface.
Compose
Use this command to start editing a new message.
Mail Folders
Use this command to view and manage what folders are currently
configured for your mailbox.
Options
Use this command to configure options for your mail account that
will be remembered the next time that you log in, such as the
number of messages to display per page in your folders, an
outgoing mail signature, etc.
Addresses
Use this command to use and maintain aliases for email addresses
and mailing lists.
Logout
Use this command to log out of your mail account.
Help
Use this command to display help features.
Message Composition
When you want to send a new message, use the "Compose" command.
Fill out the fields in the form on the message composition page,
and then either press the "Send" button to send the message, or
the "Save" button to save a draft of the message. If you decide
against creating a new message, you can use the "Cancel" button or
simply select another command from the left-hand side of the
message composition page. You can also use the "Attach" button to
attach files to your message.
Form Fields - The message composition form contains the
following fields:
To :
This box specifies who your message will be sent to when you press
the "Send" button. Enter either a valid Internet email address in
this box, such as " me@mycompany.com This email address is being
protected from spam bots, you need Javascript enabled to view it
", or an address alias that you have defined in your address book,
such as "me" or "tennismailinglist". You can also enter a list of
several addresses or aliases, separated by commas, such as "
me@mycompany.com This email address is being protected from spam
bots, you need Javascript enabled to view it , frank, bob,
dave@someothercompany.com This email address is being protected
from spam bots, you need Javascript enabled to view it ".
Subject :
Enter the subject of your message here.
CC :
If you want to 'carbon copy' your message to people other than the
primary recipient or recipients, then use the CC box to specify
additional recipients. The "CC" box uses addresses or aliases in
the same way that the "To" box does.
BCC :
If you want to 'blind carbon copy' your message to people other
than the primary recipient or recipients, then use the BCC box to
specify additional recipients.
The "BCC" box uses addresses or aliases in the same way that
the "CC" box does.
* Send Send this message.
* Save Save this message to the Message Drafts folder
* Cancel Cancel composing this message.
* Attach Files Send attachment(s) along with this message.
* Stationery A standard email form letter.
* Spelling- Spell check this message.
* Save a copy of this message Save a copy of this message on the
server.
Spell Checking Mail Messages
To spell-check a composed mail message:
1. When you are ready to check the spelling, click the Spell
Check button.
2. To change a highlighted word, select the correct word from the
list or enter the correct spelling in the New Spelling window.
3. Click the Change button (or the Change All button).
4. To ignore the word, click the Ignore button (or the Ignore All)
button.
5. When you are finished spelling, click the Done button.
Message Attachments
You can send attachments along with your messages. To include an
attachment, use the "Attach" button on the message composition
page.
1. First, select the file that you wish to attach to your
message from your local system.
2. Use the "Attach" button to start uploading the file to the
web server. Once you have pressed the button, you may have to wait
for anywhere from several seconds to several minutes, depending on
how large the attachment file is. The file will be sent from your
local computer to the web server, where it will be held in waiting
until you finish composing your message. Nothing will be sent
anywhere until you return to the message composition page and
press "Send". Once the attachment file has been sent to the web
server, Step 4 will be visible. Step 4 allows you to remove
attachments that you have uploaded, in case you change your mind
about a particular attachment or about all of the attachments. You
can return to the attachment page and use Step 4 even after you
have used Step 3 to return to the message composition page.
3. You can repeat Step 1 and Step 2 as many times as you like,
to add as many attachment files as you like to your message. Once
you are satisfied with the list of attachments, use Step 3 to
return to the message composition page to complete your message.
4. If you change your mind about any of your attachments, you
can use Step 4 to remove specific attachments.
You can safely send and receive attachments up to 52 Megs in
size.
Folder Management
Your messages are organized into folders, with your incoming mail
in a folder called "Inbox", your message drafts in a folder called
"Drafts", etc.
The "Folders" command allows you to see a list of your mail
folders and examine the contents of each folder. Press the icon
next to the name of a folder to see a list of messages contained
in that folder.
Can the folder listing be sorted ?
No. Default system folders are listed first. Personally created
folders are listed alphabetically second.
How do I create a new folder?
You can create new folders by clicking the Folders button on the
top menu while looking at your Inbox.
How do I delete a folder?
1. Check or select the folder.
2. From the pull down menu that says “Choose Action,” select
“Delete Folder(s)”.
How do I get back to my Inbox?
Click on the Inbox button on the Menu.
Options
You can use the "Options" section to store settings that will be
remembered for the next time that you log in.
Your options are broken up into sections:
General Options
Messages Per Page - The number of messages to display on each page
in the listing of messages in folders. Displaying fewer messages
per page will result in a quicker interface.
Save Deleted Messages - Saves deleted messages in their own
folder so that you can 'un-delete' messages if you like.
Save Outgoing Messages - Saves outgoing messages in their own
folder so that you have a record of messages that you have sent.
Quote Messages - Include quoted message when replying or
forwarding.
Quote Prefix - The prefix to use on each line when quoting a
message in a reply or a forward.
Personal Options
These options are primarily useful because they will be
automatically filled into the appropriate fields of the message
composition form when you create new messages. You can change your
name, return email address, signature, and other personal options.
Your Real Name i.e., "Ima Student"
Your Email Address i.e., " iestudent@artsci.domain.com This email
address is being protected from spam bots, you need Javascript
enabled to view it "
Default Outgoing Server i.e., "artsci.domain.com"
Signature Appended to all outgoing messages.
Stationery
Define "canned" messages to make message composition easier.
Change Password
Change Password
Once logged into Horde, expand the “My Account” tab on the left
menu and select “Password”. You can edit your password with this
option.
Forward E-mail
Use this tool to forward your e-mail to another e-mail account.
Auto-Reply (aka vacation)
Use this tool to set an auto-reply message when you go on vacation
or to inform others of a new e-mail address. Since this is not a
WebMail tool, a new browser window will open.
External Accounts
Check for messages on external POP3 mail accounts.
Addresses
You can create aliases that represent email addresses, to make
it easier to remember addresses that you commonly use. For
example, instead of typing " Joestudent@domain.com every
time you want to send a message to Joe, you can create an alias
called "Joe", with the value " Joestudent@domain.com
Whenever you create a new message, you can just type "Joe" in the
"To" or "CC" box instead of typing his entire email address.
You can also create aliases that represent lists of people. For
example, you could create an alias called "team", with the value "
ryanteacher@domain.com , billguidence@domain.com to represent a
particular team of people. To send mail to that list of people,
you simply enter "team" in the "To" or "CC" box when composing a
new message. You can also click the email address listed for the
alias on the "Addresses" page to have it automatically filled in
on a new message for you.
To create a new address for a person:
Copy the name and e-mail address of the person that you wish to
add to your address book. On the left menu, expand the
“Organizing” tab and click “Address Book”. A new menu will appear
at the top of your screen. Click “Add+”.
To create a new address for a group:
In your address book, select “Browse” from the top menu. Select
the individuals which you want to make a group by checking them
off, and then select “New List” or whichever list you would like
to add them to in the box with the “Select List” button. Then
click “add to”, located right next to this box. You can then edit
the options of this group by clicking the small edit icon (sheet
of paper with pencil).
Logging Out
When you are finished using your mail account, you should always
use the "Log Out" command to log out of your account. If you are
reading your mail from somewhere other than your own web browser,
then logging out is an important security precaution that will
prevent the next person that uses your web browser from accessing
your account. Even if you are not worried about security, logging
out will free up resources on your web server that would
ordinarily be wasted for as long as it takes the server to figure
out that you have abandoned it. Logging out when you are finished
is the polite thing to do.
 |